You have a design. You send it to the factory. They make a sample. You try it on. The sleeves are too long. The waist is too tight. The shoulders are off. You send feedback. The factory makes changes. The next sample is still wrong. Weeks pass. You are frustrated. I have seen this happen many times. The problem is not the factory. It is not the pattern maker. It is that you never told them exactly what you wanted. You did not provide a detailed measurement spec sheet.
Based on our experience developing thousands of samples, a detailed measurement spec sheet is the most important document in sample development. It tells the pattern maker exactly how big each part of the garment should be. For example, last year we worked with a brand from New York. They sent a sketch and a few measurements. The first sample was wrong. We asked for a complete spec sheet. They provided measurements for chest, waist, hip, shoulder, sleeve length, and body length. The second sample was perfect. The brand learned that a spec sheet is not optional. It is vital.
So, why is a detailed measurement spec sheet vital for sampling? Let me break it down. I will explain what a spec sheet is. I will show you what measurements to include. I will discuss how it prevents errors. And I will give you a framework for creating a spec sheet.
What Is a Measurement Spec Sheet?
A measurement spec sheet is not a sketch. I remember a client from Chicago. They sent a beautiful sketch. But they did not include measurements. The factory guessed. The sample was the wrong size.
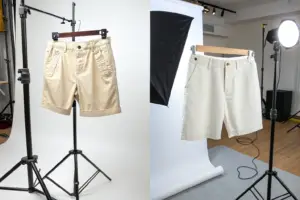
A measurement spec sheet is a document that lists all the key measurements for a garment. It includes measurements for each size. It includes tolerances. It includes measurement points shown on a sketch. For the Chicago client, we created a spec sheet template. They filled in the numbers. For woven shirts, the spec sheet includes chest, waist, shoulder, sleeve length, body length, and collar size. For knits, it includes chest, body length, sleeve length, and neckband width. For pants, it includes waist, hip, rise, inseam, and leg opening. The spec sheet leaves no room for interpretation. The pattern maker knows exactly what to target.

What Is the Difference Between a Spec Sheet and a Tech Pack?
A tech pack is the complete document. It includes the spec sheet, flat sketches, fabric details, trim list, and construction details. The spec sheet is one part of the tech pack. It focuses only on measurements. For a denim client, the tech pack includes wash specifications. The spec sheet includes rise, thigh, knee, and leg opening.
What Measurements Should Be on a Spec Sheet?
For a top:
- Chest (1 inch below armhole)
- Waist (at natural waist)
- Shoulder width (from shoulder point to shoulder point)
- Sleeve length (from shoulder point to cuff)
- Body length (from shoulder seam to hem)
- Armhole depth
- Bicep width
- Cuff width
For a bottom: - Waist (at top of waistband)
- Hip (7 to 8 inches below waist)
- Rise (from crotch seam to top of waistband)
- Inseam (from crotch seam to hem)
- Thigh (1 inch below crotch)
- Knee (13 inches below crotch or as specified)
- Leg opening
For a sportswear client, the spec sheet also includes stretch measurements. The garment is measured at rest and at full stretch.
How Does a Spec Sheet Prevent Sampling Errors?
Without a spec sheet, the pattern maker guesses. I remember a client from Boston. They said "make the sleeves standard length." The pattern maker used their standard. The sleeves were 2 inches too long. The client was unhappy.
A spec sheet prevents errors by giving the pattern maker exact targets. There is no guessing. For the Boston client, the spec sheet now says "sleeve length: 24 inches." The pattern maker knows exactly what to do. For woven shirts, the spec sheet prevents collar size errors. "Collar: 15.5 inches" is clear. For pants, it prevents rise errors. "Front rise: 10 inches" is clear. A spec sheet also prevents grading errors. When the pattern is graded to other sizes, the spec sheet provides the base measurements.

How Do You Determine the Right Measurements for Your Spec Sheet?
Start with a fit sample or a reference garment. Measure the garment that fits well. Use those measurements as your base. Adjust as needed. For a denim client, they had a favorite pair of jeans. They measured the jeans. They used those measurements for their spec sheet.
What Tolerances Should You Allow?
Tolerances depend on the garment type and fabric:
- Woven garments: ±0.5 inches
- Knit garments: ±0.75 inches (knits stretch)
- Tailored garments: ±0.25 inches
- Denim: ±0.5 inches for most measurements, ±0.25 inches for waist
For a sportswear client, the tolerance for stretch garments was ±1 inch. The fabric compensated for the variation.
How Does a Spec Sheet Ensure Consistency Across Sizes?
A single size is not enough. I remember a client from Seattle. They provided measurements for size M. The factory made the size M sample. It fit well. But the bulk production in sizes XS and XL had fit issues. The grading was wrong.
A spec sheet for sampling should include measurements for at least the smallest, base, and largest sizes. This validates the grading. For the Seattle client, we created a spec sheet with XS, M, and XL measurements. The pattern maker used these to grade. The size set sample confirmed the grading was correct. For women's wear, the spec sheet includes sizes 0, 4, 8, 12. For men's wear, it includes sizes 30, 34, 38, 42. For children's wear, it includes sizes 2T, 4T, 6, 8.

How Do You Develop Measurements for Multiple Sizes?
Start with the base size. Then define grading increments. For a top:
- Chest: +1 inch per size
- Waist: +1 inch per size
- Shoulder: +0.25 inches per size
- Sleeve length: +0.5 inches per size
- Body length: +0.5 inches per size
For a denim client, the grading increments were: - Waist: +1 inch per size
- Hip: +0.75 inches per size
- Rise: +0.25 inches per size
- Inseam: +0.5 inches per size
How Do You Validate Grading with a Spec Sheet?
After the spec sheet is created, make a size set sample. Measure each size against the spec sheet. If the measurements match, the grading is correct. If not, adjust the grading increments. For a sportswear client, the size set revealed that the size XL sleeve was too long. The grading increment was reduced from 0.5 inches to 0.375 inches.
How Do You Create a Measurement Spec Sheet?
Creating a spec sheet is not difficult. I remember a client from Denver. They thought it would take hours. They avoided it. Their samples were always wrong.
To create a measurement spec sheet, use a template. Start with a flat sketch of your garment. Mark the measurement points. Then fill in the measurements for your base size. Then define grading increments for other sizes. For the Denver client, we provided a template. They filled it out in 20 minutes. Their next sample was correct. For woven shirts, we have a template with common measurement points. For knits, the template includes stretch measurements. For outerwear, it includes armhole depth and back width.

What Tools Do You Need to Create a Spec Sheet?
You need:
- A flat sketch of your garment
- A ruler or measuring tape
- A spreadsheet or template
- A reference garment (optional)
For a denim client, they used a pair of well-fitting jeans as a reference. They measured the jeans. They entered the measurements into our template.
How Do You Measure a Garment for a Spec Sheet?
Lay the garment flat on a table. Smooth out any wrinkles. Measure:
- Chest: 1 inch below armhole, from side seam to side seam
- Waist: at the narrowest point, from side seam to side seam
- Shoulder: from shoulder point to shoulder point across the back
- Sleeve length: from shoulder point to cuff, along the outside of the sleeve
- Body length: from shoulder seam at the center back to the hem
- Inseam: from crotch seam to hem, along the inside of the leg
For a sportswear client, they also measured stretch. They stretched the fabric to its maximum and measured the difference.
Conclusion
A detailed measurement spec sheet is vital for sampling. It tells the pattern maker exactly how big each part of the garment should be. It prevents errors. It ensures consistency across sizes. It speeds up the sample process. Without a spec sheet, you are guessing.
At Shanghai Fumao, we provide a measurement spec sheet template to all our clients. We help them fill it out. We use it to make patterns. We measure samples against it. We believe that a good spec sheet leads to a good sample.
Let us help you create your spec sheet. Contact our Business Director, Elaine, directly at elaine@fumaoclothing.com. Ask for our spec sheet template. We will show you how to use it.